How to Root a Galaxy S10 SM-G973U: A Comprehensive Guide
Are you looking to unlock the full potential of your Galaxy S10 SM-G973U? Rooting your device can provide you with access to a host of customization options and advanced features. However, it’s essential to follow the proper steps to ensure that you don’t accidentally brick your device.
In this guide, we’ll take you through the process of rooting your Galaxy S10 SM-G973U. We’ll cover everything from the benefits of rooting to the tools you’ll need and the step-by-step process of rooting your device.
So, let’s get started!
Benefits of Rooting a Galaxy S10 SM-G973U:
Before we dive into the process of rooting your device, let’s take a look at some of the benefits you can expect:
- Customization: Rooting your Galaxy S10 SM-G973U gives you access to a host of customization options that are not available with a stock device.
- Improved Performance: By rooting your device, you can remove bloatware and optimize your device’s performance.
- Advanced Features: Rooting allows you to access advanced features and settings that are not available with a stock device.
- Better Battery Life: With root access, you can use battery-saving apps and settings to extend your device’s battery life.
Tools You’ll Need:
Before you begin the rooting process, there are a few tools you’ll need to gather:
-
Samsung USB drivers
-
Odin flashing tool
-
TWRP custom recovery
-
Magisk rooting tool
Step-by-Step Guide to Root a Galaxy S10 SM-G973U:
Now that you have everything you need, let’s dive into the process of rooting your Galaxy S10 SM-G973U:
Step 1: Enable Developer Options
- Go to Settings > About Phone > Software Information.
- Tap on “Build number” seven times until you see the message “You are now a developer!”
2: Enable USB Debugging
- Go to Settings > Developer Options.
- Enable USB Debugging by toggling the switch to “On.”
3: Install Samsung USB Drivers
- Download and install the latest Samsung USB drivers on your computer.
- Connect your device to your computer using a USB cable.
4: Download and Extract Odin
- Download the latest version of Odin.
- Extract the contents of the zip file to a folder on your computer.
5: Download TWRP Custom Recovery
- Download the TWRP custom recovery image for your Galaxy S10 SM-G973U.
Download TWRP
- Move the downloaded file to the same folder as the Odin executable.
Step 6: Boot into Download Mode
- Turn off your device.
- Press and hold the Volume Down, Power, and Bixby buttons at the same time.
- When you see the warning screen, press the Volume Up button to enter Download mode.
Step 7: Connect Your Device to Your Computer
- Connect your Galaxy S10 SM-G973U to your computer using a USB cable.
- Open the Odin executable.
NOTE: Unlock the bootloader Before Flash Custom Recovery
Step 8: Flash TWRP Custom Recovery
- In the Odin window, click on the “AP” button.
- Navigate to the folder where you saved the TWRP custom recovery image and select the file.
- Click on “Start” to flash the TWRP custom recovery image.
9: Boot into TWRP Recovery
- Once the TWRP custom recovery is flashed successfully, disconnect your device from the computer.
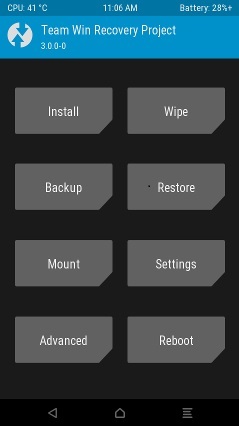
- Press and hold the Volume Up, Power, and Bixby buttons at the same time to boot into TWRP recovery.
- When the TWRP recovery screen appears, you will be prompted to allow modifications. Swipe to allow modifications.
10: Backup Your Data
- It’s crucial to back up your device before proceeding with the root process. In TWRP recovery, tap on “Backup.”
- Select the partitions you want to back up and swipe to start the backup process.
- Wait for the backup to complete before proceeding with the root process.
Step 11: Flash Magisk to Root Your Device
- Download the latest version of Magisk.
- Connect your device to your computer using a USB cable.
- Transfer the Magisk zip file to your device’s internal storage.
- In TWRP recovery, tap on “Install.”
- Navigate to the Magisk zip file and select it.
- Swipe to confirm the installation.
- Once the installation is complete, tap on “Reboot System.”
Step 12: Verify Root Access
- Once your device reboots, download the Root Checker app from the Google Play Store.
- Open the app and tap on “Verify Root.”
- If your device is rooted successfully, you will see a message that says “Congratulations! This device has root access.”
FAQs:
Q. Will rooting my Galaxy S10 SM-G973U void the warranty?
A. Yes, rooting your device will void the warranty. However, you can unroot your device to restore the warranty.
Q. Is rooting my Galaxy S10 SM-G973U safe?
A. Rooting your device has its risks, and it can potentially brick your device if not done correctly. However, if you follow the proper steps carefully, rooting your device should be safe.
Q. Can I unroot my device after rooting it?
A. Yes, you can unroot your device by flashing the stock firmware.
Conclusion:
Rooting your Galaxy S10 SM-G973U can give you access to a host of customization options and advanced features. However, it’s crucial to follow the proper steps to ensure a successful root and prevent any damage to your device. By following the step-by-step guide provided in this article, you can safely root your device and take full control of it. Remember to always back up your data before proceeding with the root process and proceed with caution.
